

My third year in college was also my first year living in a dorm. I had completed my associates degree and began my bachelors degree at a university that required all first year students, transfers included, to live in the dorms… the freshman dorms. It wasn’t the end of the world but around Christmas time I decided I wanted to cook. I was without a kitchen for months and wanted to cook! I wanted to bake! So I set out to utilize the kitchen that was set up in the common area for all the dorms to use. I settled on a gingerbread house.
It was an epic gingerbread house too! I remember it like it was yesterday… I decided on a victorian house. I made a two story bay window kind of thing on the front. I made the dough from scratch. I rolled it, cut it, and baked it. I assembled it. I realized I forgot the back side of the chimney where it met the roof so there was a hole if you looked at it. And I have no memory of what I even did with it when I was finished. I lived in a dorm, where would I have kept it?!
Anyway, that was before Facebook was open to the public, only college students could have an account and to post a photo you had to take one on the digital camera, transfer it to the computer, upload it to Facebook, and the process was just a whole thing. So instead I have printed photos of it in a scrapbook… black and white with flowers… hiding in a box someplace because I can’t find it. 🙁
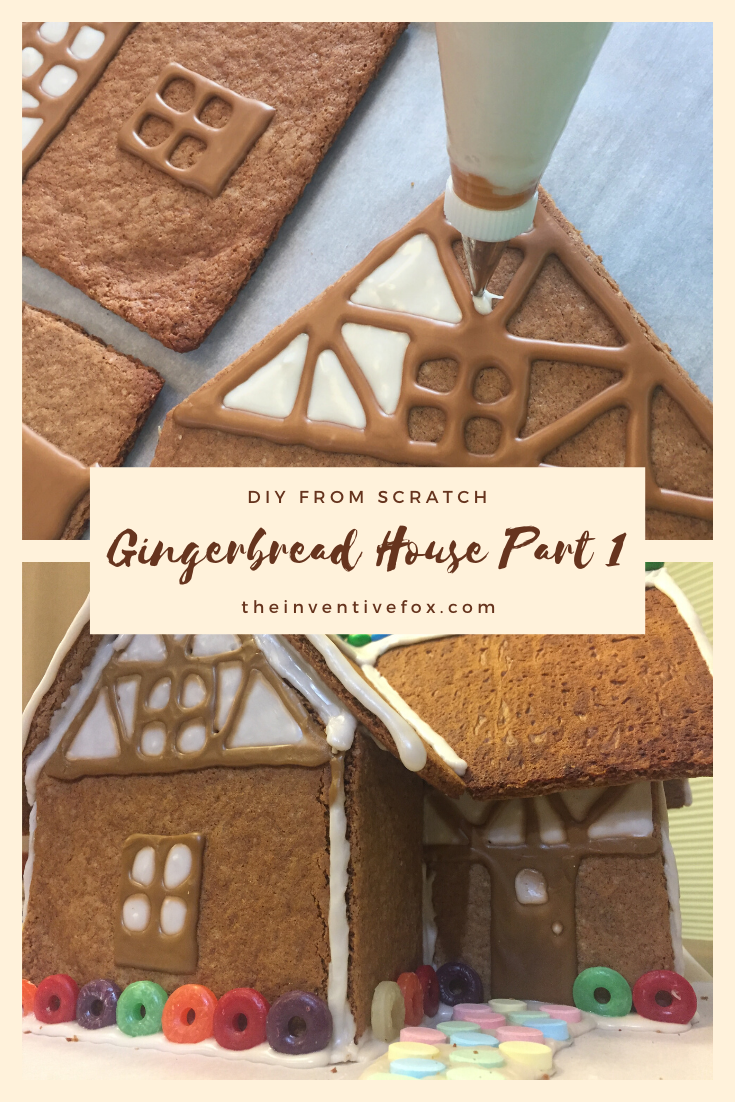
Well, this year I decided to try my hand at making another one from scratch! Pattern and all! ANNNNNNDDDDD share it with you!!! When you sign up to follow my blog you’ll get a FREE PDF of the pattern that you too can make at home!
Now, if you want to skip all the dough making, the baking, the decorating, and so on, you can always print the template. Trace it out on some cardboard and assemble that! I’m not sure how icing it would work so if you try it, let me know! Otherwise, an easy clean up way…. just print the template, color it, tape it to some cardboard and viola! An easy, little mess gingerbread house for the little ones to decorate! (Or if you’re just not in the mood for all that baking…)
Any links to products will cost you no more than if you found it on your own, but a purchase will help me earn a little.
The Recipe
First let me say that I am a fan of the Great British Bake Off. I’m not so keen on the fact that Mary Barry is no longer with the show but I still appreciate the art that goes into all the baking. Plus, I’ve learned some things are way easier than I ever imagined (hot water pastry? yep, I’m a fan) and some things that I will NEVER attempt! Sfogliatella will always be purchased if I am to consume it.
After watching all of their shows, and it seems every season has had a gingerbread creation, I decided I needed a Paul Hollywood recipe. The internet does not disappoint. Here is the link to the recipe I found. Of course it is measured out by weights… it is British! And, some of the ingredients are interesting and not really what we call them in the United States. So, I did some research, I ordered on Amazon, and I attempted to measure what I weighed to give you a better idea of how to make the recipe if you don’t have a kitchen scale.
- 500g plain flour, plus extra for dusting (approx. ___ cups, sifted)
- 2 tsp bicarbonate of soda (this is just baking soda)
- 2 tsp ground cinnamon
- 2 tsp ground ginger
- 1 tsp ground cloves
- 200g cold unsalted butter, cut into small dice (turns out to be just under two sticks, approximately 14.5 Tablespoons)
- 175g caster sugar (This is supposed to be a texture between granulated and powdered sugar. My research said you could just food process a little granulated sugar, I just used regular granulated.)
- 2 medium eggs
- 150g golden syrup (Amazon. It really is like light corn syrup but with a light honey taste. It is unique.)
- 150g black treacle (Similar enough to molasses for my purposes!)

Follow the instructions for mixing it all together and it makes a pretty decent gingerbread. For my house I had to make two batches and used the left overs to make some gingerbread men. Most of the designs flattened and were not as beautiful as when I cut them. It could be the fact that I live over a mile above sea level or it could just be that I allowed the dough to get too warm before baking? I’d probably knead in a little extra flour and make sure the pieces are chilled before baking.
The Design
Buddy ol’ pal Pinterest and I spent some time together looking for inspiration. If you want to see all the designs, decor ideas, and such that I have been collecting, be sure to follow me on Pinterest and my Gingerbread House board. Eventually I decided on a tudor inspired design and used a house floor plan idea I found to create a template. Back in the college days I just went for it and skipped the template but I wanted to have a quality template to share with you! So, don’t forget to subscribe to my blog so you can get your free printable template.
The only downside is I decided to make the house so that all the walls would fit on letter sized paper. I say walls because I then added an overhang to the roof and the longest pieces are the same length as a sheet of paper. *face palm* So, I have one template that is legal sized and then one that is letter sized but a slightly scaled down version of it so it would fit.
First step was sketching out the shapes of each piece. That’s where my drafting skillz from my previous life came in handy! Next I took to hacking up some cardboard boxes to get everything just right. Finally, I assembled the house using masking tape to make sure it all fit together. It was BEAUTIFUL!
Decoration would be determined later.
Creating the Pieces in Gingerbread
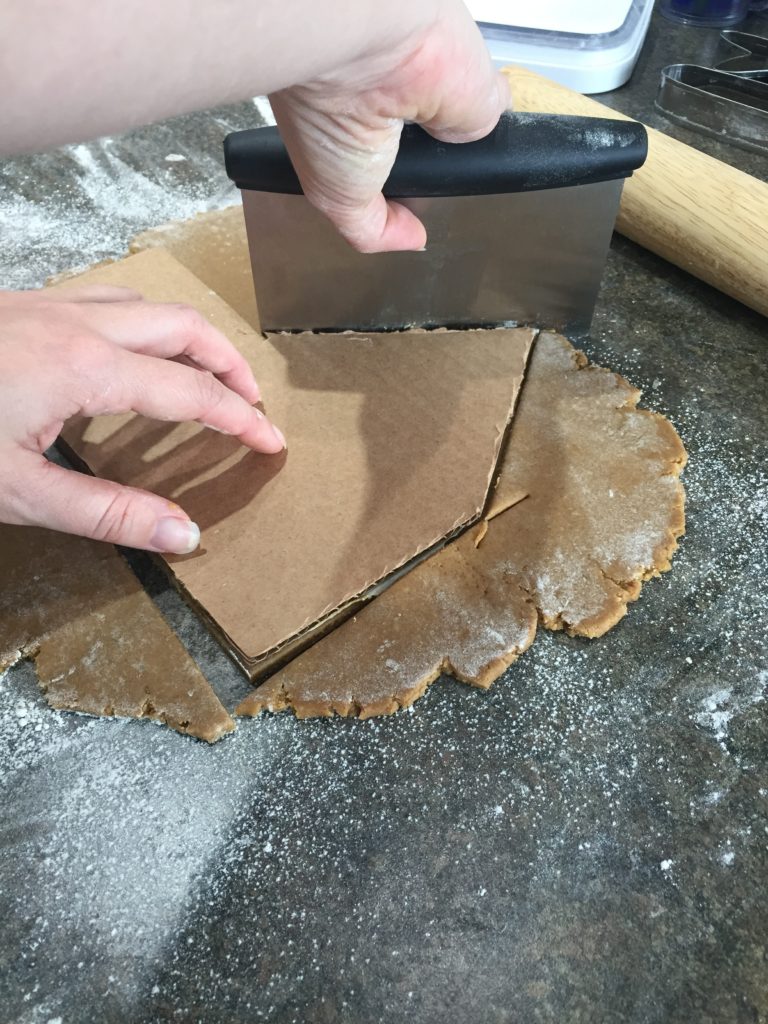
I made the dough a few days in advance. It was Thanksgiving Break and nap times are required. Plus I’m making a human so… yeah… naps! This ensured that the dough was properly chilled, except that I let it set out while I rolled out the dough. Once it was all nice and flat I tore apart my assembled cardboard house and used each piece to cut the shapes. Put it on a cookie sheet with some parchment paper (I LOVE that stuff…) and bake per directions.
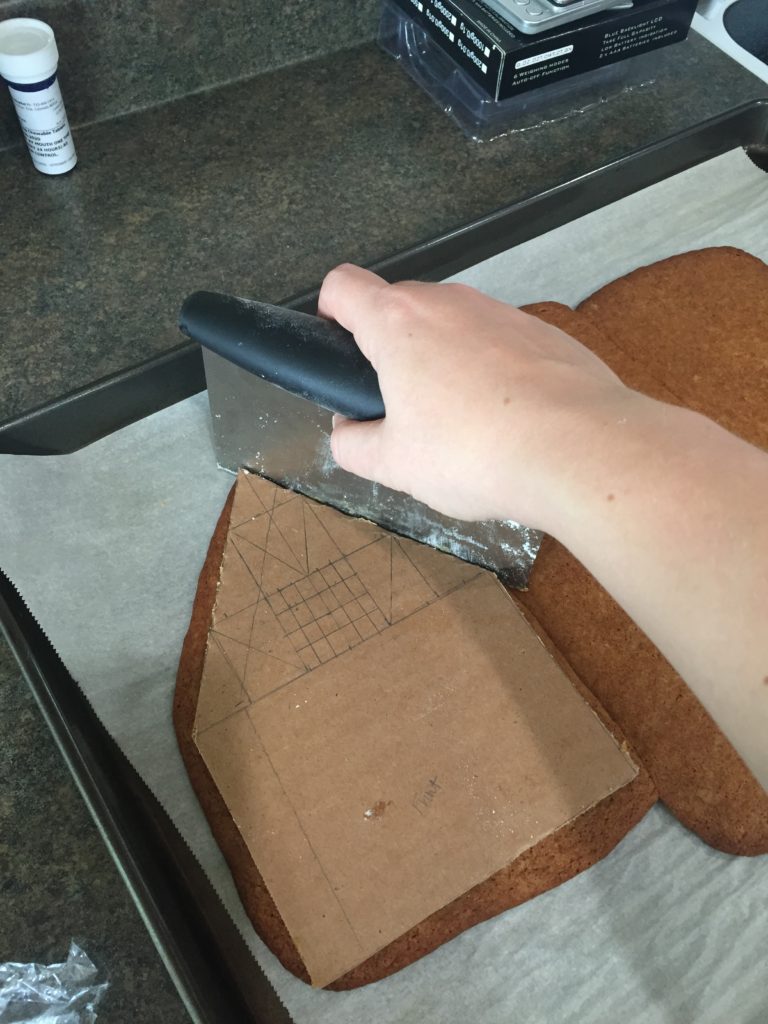
Now, in the ideal world they would come out of the oven looking identical to how they were when they went in. Mine spread out so I did what they do on the Great British Bake Off… I trimmed the cookies while still warm. Easy.
Then I left them on the sheet to cool for a little longer keeping the cut away scraps for the husband to devour later. He appreciated it.
See Part 2 for assembly and decoration. Don’t forget to subscribe and I’ll share the template I used.